Virtual reality (VR) technology has been rapidly growing, allowing users to immerse themselves in digital worlds like never before. From gaming to movies, education to professional training – VR is revolutionizing how we experience digital content across various fields. As the craze for VR experiences rises in India, the market is flooded with many VR headset options to suit different budgets and needs.
In this article, we’ll explore the best VR headsets available in India. Whether you’re a gaming enthusiast seeking thrilling adventures, a movie buff craving an unmatched cinematic experience, or a professional looking to enhance training simulations – we’ve got you covered.
Choosing the right VR headset can be confusing with so many options out there. From standalone devices to headsets that need connecting to PCs/consoles, budget-friendly picks to premium offerings – each VR headset comes with its own set of features and limitations. Our guide aims to simplify this decision by providing in-depth analysis, user feedback, and expert insights to help you make an informed choice aligning with your preferences and requirements.
We’ll evaluate flagship VR headsets from renowned brands like Meta (formerly Oculus), Sony, HTC as well as emerging players like Pico. The evaluation will be based on factors such as display quality, field of view, motion tracking, controller functionality, and overall user experience. We’ll also look at the compatibility of these headsets with different platforms like smartphones, gaming consoles, and high-end PCs to ensure you find the perfect match for your existing setup.
Whether you’re a seasoned VR enthusiast or just getting started, this article promises to be your ultimate guide to navigating India’s VR landscape. Get ready to blur the lines between reality and virtual worlds as immersive experiences await at every turn!
7 Best VR Headset Under 5000-10000-15000-20000-30000 Rupees In India
Above, I have shared the names of India’s cheapest and best VR headsets. Now, we will check each of them in detail to get some idea about the features and performance.
| VR Headset | Check Price (₹) |
|---|
| Meta Quest 2 | Check Now |
| Pico 4 | Check Now |
| Irusu VR Headset | Check Price |
| HTC Vive Cosmos Elite (PC VR) | Check Inbox |
| Jio JioDive JD-004 VR Headset | Check Price |
| Meta Quest 3 | Check Price |
| HTC Vive Pro 2 | Check Price |
[lwptoc min=”1″ depth=”6″ numeration=”none” numerationSuffix=”none” title=”Table Of Contents” toggle=”1″ hideItems=”1″ smoothScroll=”1″ smoothScrollOffset=”30″ width=”auto” float=”none” titleFontSize=”default” titleFontWeight=”bold” itemsFontSize=”100%” colorScheme=”light” backgroundColor=”#fcfcfc” borderColor=”#1abc9c” titleColor=”#1abc9c” linkColor=”#1abc9c” hoverLinkColor=”#1abc9c” visitedLinkColor=”#1abc9c”]

The Meta Quest 2 remains a dominant force in the VR market due to its well-rounded features and established brand. Sporting a comfortable design, high-resolution display (1800 x 1800 per eye), and smooth performance with its Qualcomm Snapdragon XR2 processor, it caters to both casual users and enthusiasts.
The Oculus Store offers a vast library of games, apps, and experiences, ensuring something for everyone. Setup is relatively simple, and the included Touch controllers provide intuitive interaction within VR environments.
Users can explore diverse virtual worlds, compete in multiplayer games, or even get a workout in VR. While the Meta Quest 2 might not match the raw processing power of high-end options, it delivers a compelling balance of affordability, features, and content accessibility.
| Feature | Pros | Cons |
|---|
| Price | Mid-range, good value for features | May require a Facebook account for setup (subject to change) |
| Processing Power | Handles most VR experiences well | Might not match the power of high-end options |
| Content Library | Extensive library of games, apps, and experiences | May require additional purchases for desired content |
| Setup | Easy and user-friendly | Requires a Facebook account for setup (subject to change) |

The Pico 4 is a newer entrant vying for the top spot in the standalone VR market. It boasts a powerful Qualcomm Snapdragon XR2 processor similar to the Meta Quest 2, but with the potential for improved performance.
The high-resolution display (4352 x 2160 combined) promises exceptional visuals, and the ergonomic design prioritizes comfort during extended VR sessions. The Pico Store is still growing, but it offers a variety of games and apps to explore.
This includes options for fitness, social interaction, entertainment, and even educational experiences. The Pico 4 caters to VR enthusiasts seeking a powerful standalone option without the need for a PC or smartphone connection.
However, it’s important to consider that the app library might require more time to develop a robust selection compared to established brands like Meta. Additionally, some users might find the headset bulkier than some competitors.

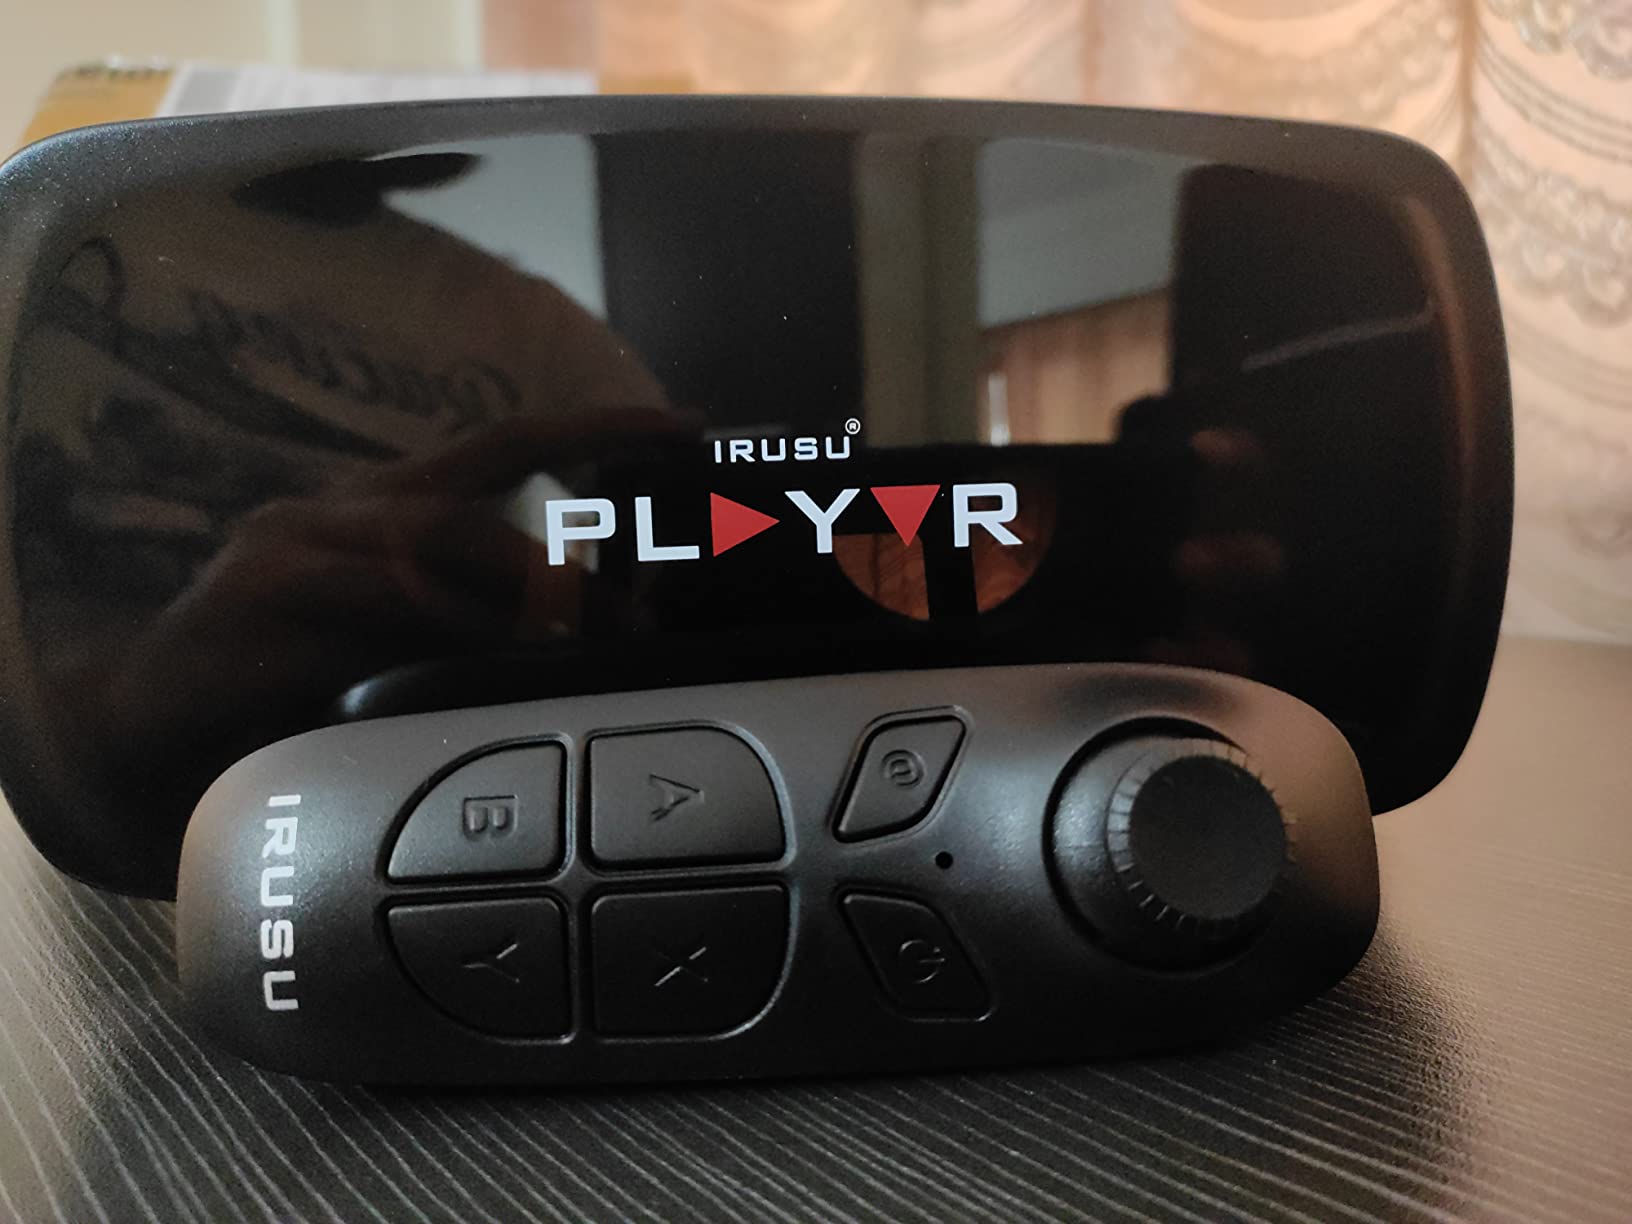
Craving an affordable VR experience? The Irusu Play VR Ultra 3D headset might be your ticket. It boasts 40mm HD lenses designed for clear visuals and minimal distortion, ensuring a realistic VR world. Adjustable focus and pupil distance cater to individual needs, reducing eye strain during longer VR adventures.
Immersion goes beyond visuals – the Irusu Play VR Ultra features built-in, adjustable headphones. High-quality audio complements the visuals, transporting you deeper into the virtual world. Plus, the adjustable design ensures a comfortable fit for various ear shapes, enhancing user experience.
Navigating virtual environments is a breeze with the built-in touch button. This eliminates the need for a separate controller, simplifying VR interaction in games and multimedia experiences. Keep in mind, the included remote might not work with iPhones or Samsung Galaxy phones.
The Irusu Play VR Ultra caters to a wide range of smartphones (4 to 6.9 inches) with gyroscope sensors. However, for the best VR experience, ditch Youtube and explore VR apps available on app stores. Overall, this headset offers a budget-friendly and comfortable entry point for VR enthusiasts seeking an immersive adventure.
| Feature | Description | Pros | Cons |
|---|
| Lenses | 40mm HD Lenses | – Affordable VR experience | – Limited Youtube VR support (better with VR apps) |
| Focus & Pupil Distance | Adjustable | – Clear visuals with adjustable focus & pupil distance | |
| Audio | Integrated, Adjustable High-Quality Headphones | – Immersive audio with integrated headphones | – Remote not compatible with iOS & Samsung Galaxy |
| Controls | Inbuilt Touch Button | – Easy navigation using built-in touch button | |
| Mobile Compatibility | Smartphones (4-6.9 inches) with Gyroscope Sensor | | |
| Comfort | Adjustable Focus, Pupil Distance, and Headphones | – Comfortable design for extended use | – Lacks features of high-end VR headsets (hand tracking, wider field of view) |
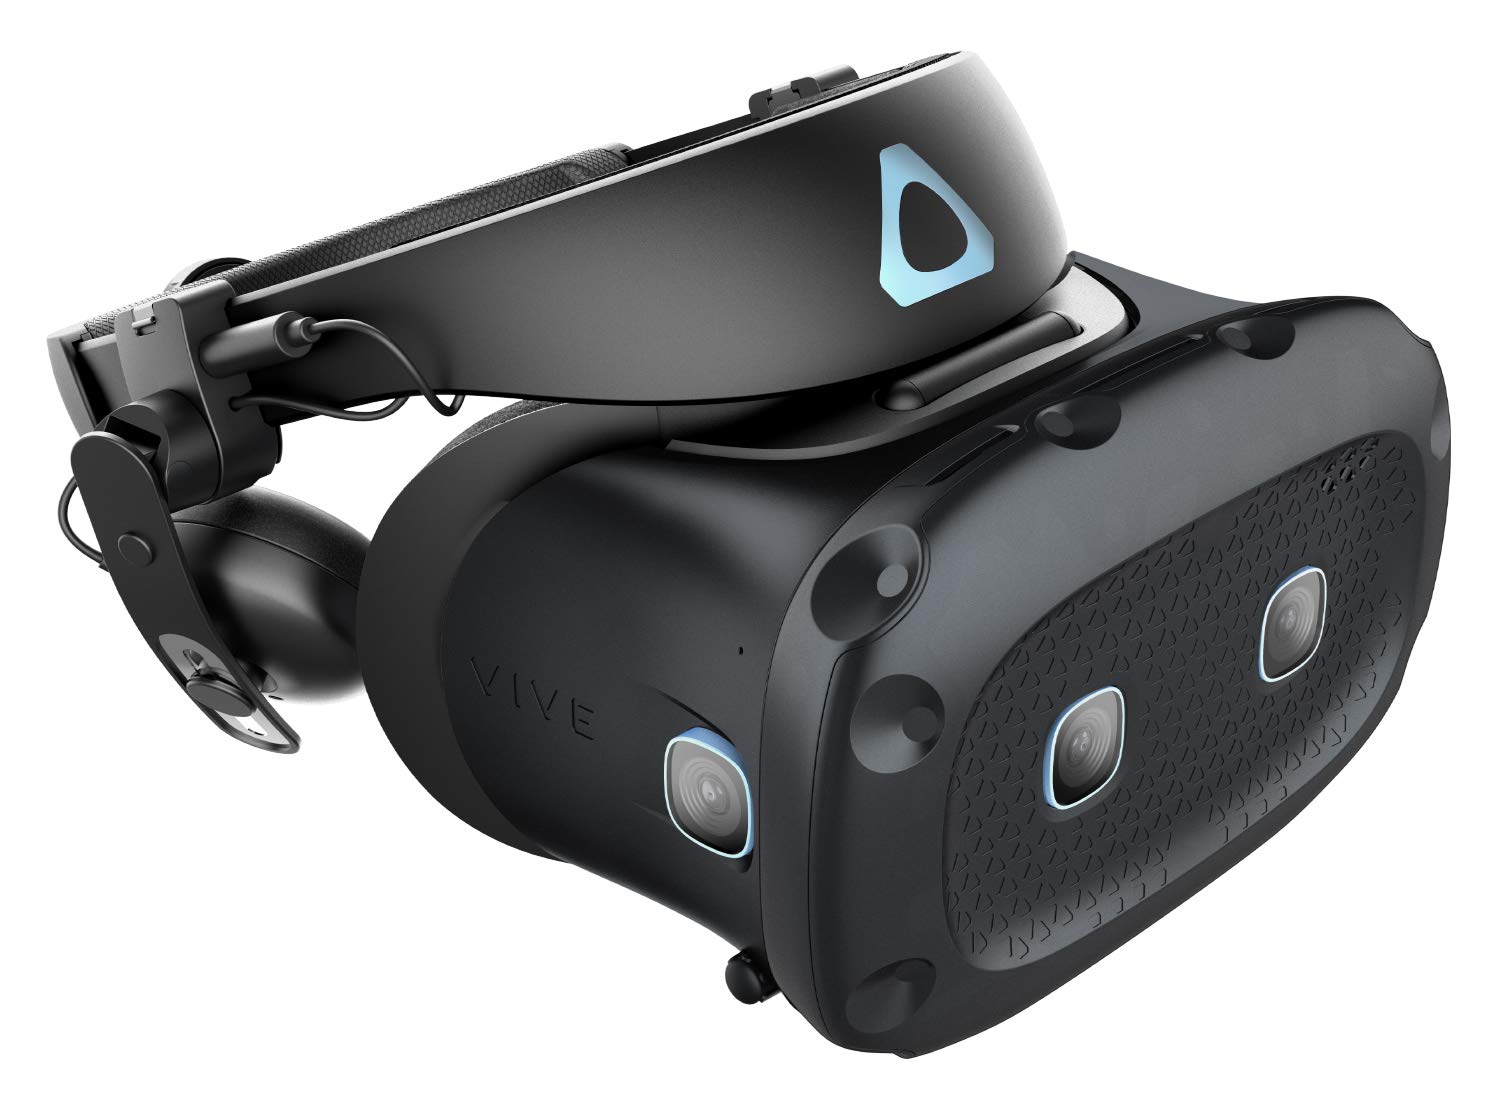
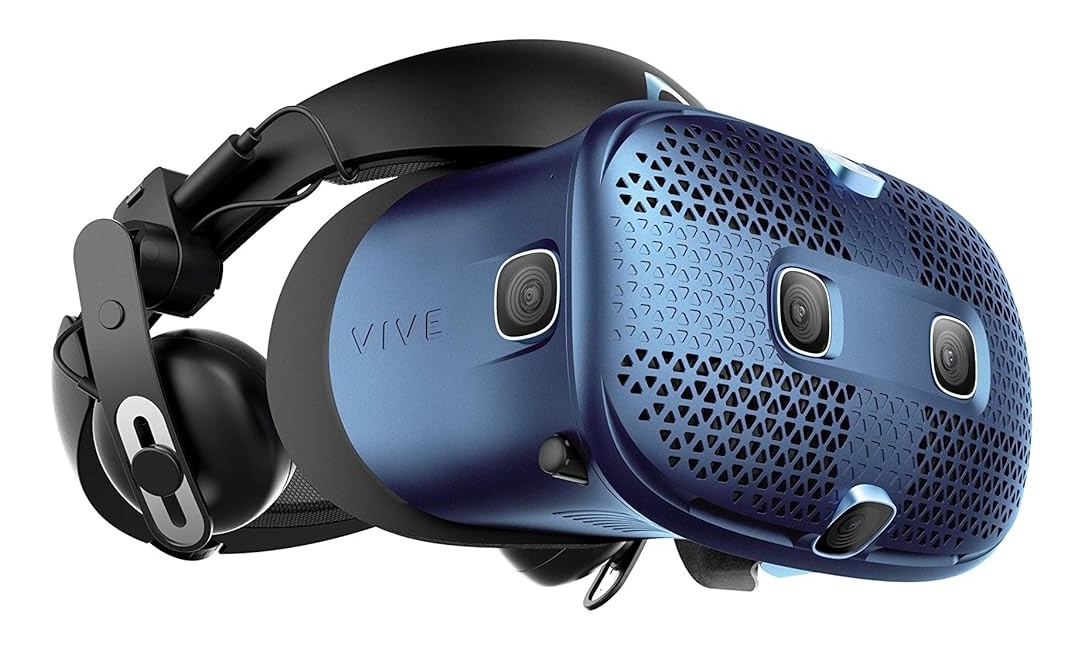
 The HTC Vive Cosmos Elite caters to VR enthusiasts with powerful PCs. It boasts high-resolution displays (1440 x 1700 per eye) for exceptional visuals and a wide field of view (110 degrees) for immersive experiences.
The flip-up design allows for easy transitions between VR and the real world, enhancing usability. The tracking system utilizes external sensors for precise movement detection within the VR environment.
This allows for a more natural and responsive gaming experience compared to some standalone options. However, the PC VR nature requires a powerful gaming PC with a compatible graphics card and processing power for smooth operation.
Additionally, the setup process can be more complex compared to standalone headsets, involving setting up the external sensors.
The Jio JioDive JD-004 VR Headset is a new entrant in the Indian market, specifically targeting Jio subscribers. Information is still limited, but it’s expected to be a budget-friendly standalone option.
There’s a possibility of Jio-specific integrations and pre-loaded content, catering to the Indian user base. Like the Irusu VR Headset, it’s likely suitable for casual VR experiences and might have a growing library of compatible apps.
However, due to the limited information available, the processing power, content library features, and overall performance remain uncertain.

The HTC Vive Cosmos Elite caters to VR enthusiasts with powerful PCs. It boasts high-resolution displays (1440 x 1700 per eye) for exceptional visuals and a wide field of view (110 degrees) for immersive experiences.
The flip-up design allows for easy transitions between VR and the real world, enhancing usability. The tracking system utilizes external sensors for precise movement detection within the VR environment. This allows for a more natural and responsive gaming experience compared to some standalone options.
However, the PC VR nature requires a powerful gaming PC with a compatible graphics card and processing power for smooth operation. Additionally, the setup process can be more complex compared to standalone headsets, involving setting up the external sensors.

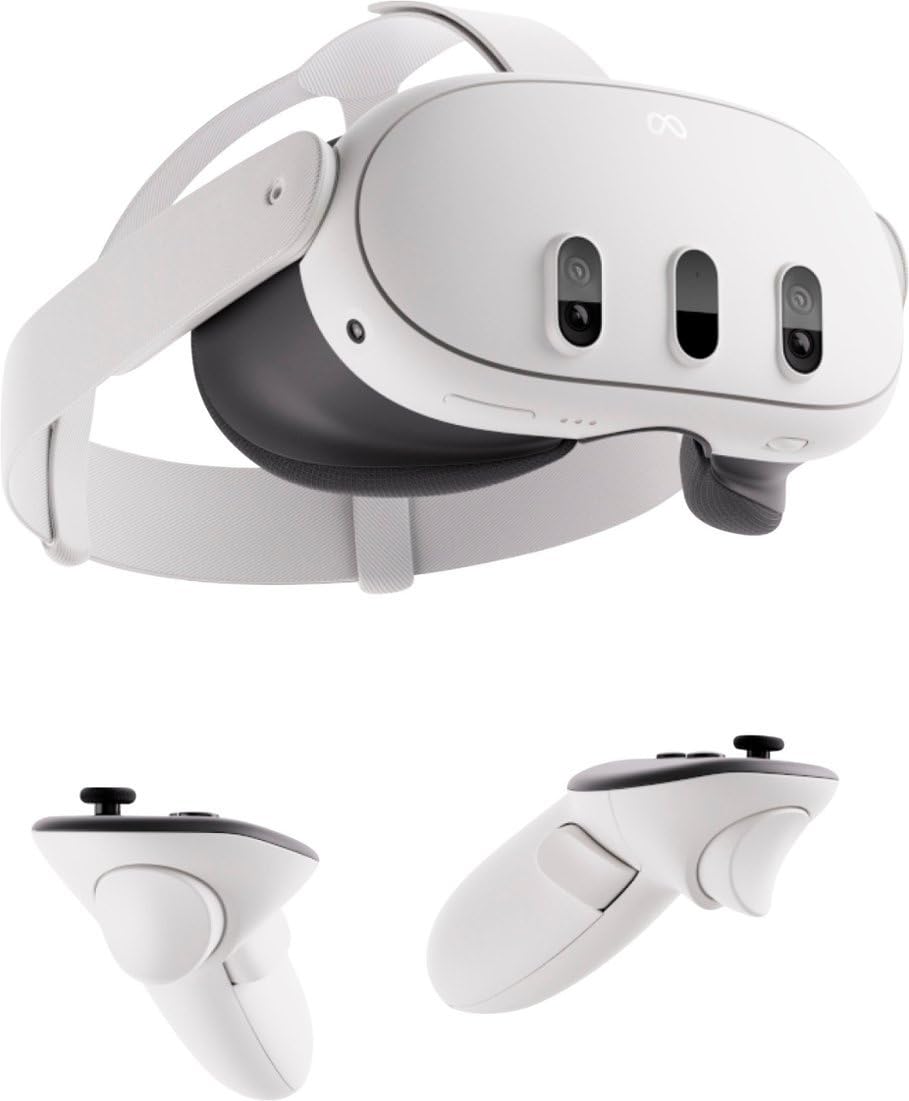
The Meta Quest 3 is the game-changer, transforming your home into a mixed reality playground. Buckle up for mind-blowing experiences with double the processing power of the Quest 2, rendering virtual worlds in stunning detail thanks to the 4K+ Infinite Display.
Immerse yourself further with rich 3D audio crisper sound, deeper bass, and 40% louder than the Quest 3! The innovative Touch Plus controllers deliver precision and realistic sensations, but the real future is here: Direct Touch lets you navigate and interact with just your hands! Dive into a massive library of over 500 VR apps, from games and fitness to entertainment and social experiences.
Enjoy an average of 2.2 hours of playtime with a Battery Saver mode for extended sessions, and a fast-charging adapter to keep you exploring the boundless possibilities of VR. The future of VR is looking bright with the Meta Quest 3 on the horizon!
Conclusion:
VR Headset has amazing features, and technology keeps growing daily, so enjoy the endless virtual reality journey. This is a different experience that is full of excitement and adventure. The endless advancement of technology can make us go anywhere virtually. Everyone loves to experience this virtual reality, so the list of some of the best VR headsets for you is above.
You can buy the best VR headset based on your budget and requirements. VR headsets are not just for playing video games and watching movies; you can also use them for learning. It is a quicker and better way to learn things, so most sectors opt for virtual reality technics. I hope the above-shared list of the best VR headset can help you finalize the suitable VR headset to experience the best version of the technology.
You can see the world without going physically but feel like you are there. What else do we require in our busy day-to-day life? Everyone can benefit from this device because it, if some of all, for your best entertainment, like watching TV, Playing Video games, for your kids to provide better understanding and learning. VR headsets come with lots of the same or additional sets of features that will change your experience towards entertainment, education and many more sectors.
Virtual reality systems help you save time and money. If you are looking for a VR Headset, always consider the buying guide and your requirements, like for majorly what purpose you are buying it. Only then will you be able to select the best product for yourself? I believe that all the products available in the market are mostly good. Still, it is very important to choose the right one that can perfectly match your requirements because if the product meets your requirements, only the customer will be happy. So first, list your needs, purpose and budget, and then you are all good to go for perfect buying.
Virtual Reality Headsets(VR) Guide
Virtual reality (VR) has gained tremendous popularity in recent years, allowing users to enter fully immersive digital worlds. With the advancements in VR headsets, this technology has become more accessible and affordable for gaming and professional applications. However, choosing the right VR headset is crucial for an optimal experience. This guide will help you navigate the different options and make an informed decision.
Types of VR Headsets
Tethered VR Headsets
Tethered VR headsets like the Valve Index, HTC Vive, and Oculus Rift offer the highest quality visuals and performance. These headsets require a powerful PC or gaming console to run and are connected to the device via a cable. While more expensive, they provide the most immersive experience with high-resolution displays, fast refresh rates, and wide fields of view (FOV). Examples: Valve Index, HTC Vive, Oculus Rift.
Standalone VR Headsets
Standalone VR headsets, like the Oculus Quest and Pico 4, are self-contained and do not require a separate device. These headsets are more affordable and portable, making them a convenient option for casual VR experiences. However, they have limited processing power compared to tethered headsets. Examples: Oculus Quest, Pico 4.
Mobile VR Headsets
Mobile VR headsets, such as Google Cardboard and Samsung Gear VR, use a smartphone as the display and processor. These are the cheapest options but have limited capabilities, making them suitable for entry-level VR experiences. Examples: Google Cardboard and Samsung Gear VR.
Key Factors to Consider
Display and Graphics
The quality of the display and graphics plays a crucial role in the overall VR experience. Key factors to consider include resolution, refresh rate, and field of view (FOV). Higher specs generally provide better visual quality and reduce motion sickness.
Tracking and Controllers
Tracking technology determines how accurately the headset can track your movements. Inside-out tracking uses cameras on the headset, while external sensor tracking requires additional sensors. 3 degrees of freedom (3DoF) allows rotational tracking, while 6 degrees of freedom (6DoF) enables positional tracking for a more immersive experience. Motion controllers also vary in ergonomics and functionality.
Comfort and Ergonomics
Comfort and ergonomics are essential for long VR sessions. Look for headsets with good weight distribution, padding, and adjustability. Accessories like VR covers and VR gloves can enhance comfort and hygiene.
Content Library
The availability of compatible games, apps, and experiences is crucial. Ensure that the content library for your chosen platform aligns with your interests and needs.
Pricing and Budget
VR headsets range from very affordable to premium high-end options. Balance your budget with the desired features and performance level.
Setup and Usage Tips
- Hardware requirements: Ensure your PC or console meets the minimum specifications for tethered headsets.
- Space requirements: Clear a safe play area and set up boundaries for room-scale experiences.
- Safety precautions: Be aware of your surroundings, take breaks, and follow manufacturer guidelines.
- Comfort tips: Use VR covers for hygiene, adjust headset straps for proper fit, and consider full body trackers for enhanced immersion.
Future of VR Headsets
The future of VR headsets looks promising, with upcoming releases and innovations on the horizon. We can expect advancements in display technology, wireless capabilities, full body motion tracking, and integration with emerging technologies like AI, metaverse, and augmented reality (AR). Companies like Meta, HTC, and Valve are leading the way in pushing the boundaries of immersive experiences.
Conclusion
Choosing the right VR headset is essential for an optimal virtual reality experience. Consider factors like display quality, tracking technology, comfort, content library, and budget. With the rapid advancements in this field, VR is becoming more accessible and immersive, opening up new possibilities for gaming, education, healthcare, and beyond.
Q&A:
Q: What is the difference between tethered and standalone VR headsets? A: Tethered VR headsets require a powerful PC or console and are connected via a cable, offering the highest quality visuals and performance. Standalone VR headsets are self-contained and do not need a separate device, making them more portable but with limited processing power.
Q: How important is the field of view (FOV) in a VR headset? A: The field of view (FOV) is crucial for an immersive VR experience. A wider FOV allows you to see more of the virtual environment, reducing the “binocular” effect and increasing the sense of presence.
Q: Can VR headsets be used for professional applications beyond gaming? A: Yes, VR headsets have numerous applications beyond gaming, such as medical training, educational simulations, architectural visualization, and virtual tours. The immersive nature of VR makes it a powerful tool for various industries.
Q: What are some emerging trends in the VR industry? A: Some emerging trends include full body motion tracking, AI integration, metaverse integration, augmented reality (AR) and mixed reality (MR) experiences, telehealth applications, and the development of extended reality (XR) technologies.


 The HTC Vive Cosmos Elite caters to VR enthusiasts with powerful PCs. It boasts high-resolution displays (1440 x 1700 per eye) for exceptional visuals and a wide field of view (110 degrees) for immersive experiences.